Andria’s seafood was brought to the lovely Ventura Harbor Village in 1982 where till this day this family owner restaurant has been the recipient of national and local accolades, as Andria’s Seafood has been voted by locals “best seafood restaurant” multiple times. As a seafood enthusiast I have been eating at Andria’s since I was in elementary school, and later in life I go every other Sunday with my mom for brunch there. The food is amazing, and their fish and chips is a staple to their business. Pair some fish and chips or calamari and chips (which ever you fancy) with a bread bowl of clam chowder and you’re taste buds are going to be on cloud nine. For the most part the line isn’t short but for very good reason, their food is so fresh and delicious it will always be a top tier option for seafood in Ventura.
The best part of being family owned is they care about their employees and their community. On their website they openly mention they budget yearly to helps causes and they are always accepting applications. A few examples of who they have helped recently are the kids in the community. They sponsor the boys and girls club, and the Ventura County Junior Golf Association. There is nothing better than helping our the kids as they are the future of our country.
Along with the amazing menu, Andria’s Seafood has their very own fish market located conveniently in their restaurant! As you grab your seat inside or outside, right around the corner from the front counter is rear counter with fresh fish for sale. This is something that just adds to the ambiance of the restaurant and reinforces how fresh their dishes are. Want even more atmosphere? No problem, as Andria’s is located right on the harbor! Take a seat outdoors on the patio and get that fresh beach breeze, stare at some boats rocking back in forth, or throw some fries to get some action from the seagulls. Its also a stones throw from the beach, a nice walk from Andria’s to the sand has local shops, an arcade, and mounted binoculars to see extra sites along the way. Atmosphere and food, what more can you really ask for and this is a clear reason why Andria’s has been the best for the last 40 years. Next beach day stop by for a bite and you will realize why they are the best and might even take a page out of my routine, order two meals one for now and one to go.
Xielo Artisan Desserts is a dessert shop located in downtown Oxnard, CA that specializes in authentic Mexican pastries, crepes, and raspados (shaved ice). Xielo is a MUST-TRY for anyone with a sweet tooth. If you’ve been looking for heavenly desserts… look no further!
I took my first trip to Xielo on a weekday afternoon and was greeted with a line of people out the door, a telltale sign of good food, if you ask me! The line moved quickly, and I was soon able to step inside to admire the cozy cafe. The cafe was charming with a brick wall on one end and a large image of the Guadalajara Cathedral on the other end. There were glass cases on the counters that displayed a variety of pastries that looked so delicious I wanted to taste each one!
The staff member taking my order was polite and patiently answered my questions. I decided on the Nutella crepe and took home a variety of pastries for my family including guava empanadas, an apple bar, a slice of pastel de requeson (cottage cheese cake), and of milhojas (puff pastry) cake.
The crepe was made in front of me and my order was ready quickly. I was pleasantly surprised by every bite I took of the crepe which was filled with strawberries, bananas, xielo cream, and Nutella. It was lightly dusted with powdered sugar. The crepe was soft and had the perfect amount of fruit. It wasn’t overly sweet; every bite was truly heavenly.
My family also enjoyed their desserts, and I am already planning my next trip to Xielo. There are a ton of other items on their menu that I’m excited to try, such as jericallas (Mexican custard dessert), estrellitas (star cookies), and savory crepes. For you coffee-lovers out there, Xielo also has traditional Mexican cafe de olla. I, for one, am especially excited to visit on a warmer day to try out their raspados.
Don’t hesitate to stop by Xielo Artisan Desserts the next time you’re craving something sweet. Grab one of your favorite Mexican treats or try out something new— you won’t be disappointed!
As I arrived with my friend at Yolanda’s Mexican Cafe located at 1601 Victoria Avenue we had one thing in mind; appetizers. When we arrived we were greeted by very nice hostesses and all the other staff members that provided us service had a great positive energy as well. We chose to sit in their covered patio section as it has an amazing view of the Seabridge harbor, is full of color, and the heaters there are really effective.
Onto our food, we ordered the sampler platter for $16 dollars off their appetizer menu. I can tell you this was the perfect dish for two homies to share while we caught up with each other about our past week. The sampler platter included two quesadillas, two chicken taquitos, two jalapeno poppers, guacamole, sour cream, ranch, a mild red sauce, and the absolute highlight of the platter two mini chimichangas. The mini chimichangas are small, fried bean and cheese burritos with shredded cheese on top. They always have a perfect crunch to them and their taste is a 10/10. I feel like I could eat ten in one sitting. I found their guacamole to be really tasty and it went well with almost everything on the table including the free chips they sat us down with. There wasn’t anything included in the sampler platter we did not like but I would not recommend the jalapeno poppers when there are other appetizers like the mini chimichangas, the taquitos, and the quesadillas on the menu.
The pristine untouched frontier in a human life is within the human being itself!
It has been said
“We know what we know”
“We know what we don’t know”
And
“We don’t know what we don’t know.”
How are you, how will you, discover what you don’t know about yourself?
One begins, one’s own quest, and continues one’s quest by entertaining, by holding open the possibility that we can discover what we don’t know about ourselves, that we may well not know, what we need to know, about ourselves.
In other words, our individual willingness, and commitment is necessary, in being present and aware of our desire to find out what we need to know about ourselves within ourselves as we go about our outwardly life. Until we discover what we need to know, part of which is certainly about our best of self, which we need to meet whatever challenges we face.
Growing up during the early 2000s, I didn’t have the fortunate resources teenagers have today with finding their match to the proper foundation, or the extensive shade ranges that you find in your local Sephora. My foundation would turn out too dark or too yellow, and don’t get me started on the blending. Have you seen what paint samples look like at Home Depot? My foundation looked like Joyful Orange bordering next to Natural Almond, just a complete mess.
Thankfully, I have learned from my mistakes and want to share 3 tips I have learned in the last 11 years as a professional makeup artist. These tips will help anyone find their perfect match in foundation that fit within your budget. Not everything has to cost more than $35 USD.
1. Findation.com
I can’t even begin to explain how brilliant and easy this website is. I have been using Findation.com for the last 6 years and was amazing to work with during the COVID-19 pandemic and working as a beauty specialist trying to sell makeup without trying the product out on a customer.
The site has big claims as it states “1577 global brands, over 8,000 products, & 77,000 makeup shades.” Of course they couldn’t accomplish this without their users. Findation states they “use data from over 46 million foundation users worldwide and a sophisticated propriety algorithm to match shades between brands.”
Image taken from Findation.com
When you reach Findation.com, you will be welcomed by the “Get Started” page, where you will proceed to enter in current or past products you wear that are an exact match in just 3 easy steps. For the sake of demonstration we’re going to use a L’Oreal Paris discontinued product for my search.
After you have filled out the short questionnaire, the menu will then pull up all the brands on their website in which your shade will match to another brand of any preference.
I personally have used this for clients who want to move into a cleaner brand, into a less costly brand, and even when looking for a substitute in a drugstore on vacation. The greatest part about this website, is that it doesn’t just do foundation, but does all makeup and even skincare. With the ease of access on your mobile phone, you can use Findation.com anywhere!
2. Finding Your Undertone
Neutral, warm, cool, red, blue, yellow, and green! A lot of makeup users aren’t aware that foundation has an undertone that matches our natural skin undertone. Some even result to swatching more than 10 foundations on their arm and end up looking like a monochromatic tiger. Here are some easy ways to determine your foundation match right.
First start by figuring out your skin undertone. According to Maybelline.com, there are 4 different ways you can determine your skin undertone that won’t make you frustrated or dizzy.
Vein Test: looking at the veins on the underside of your forearm can help determine your undertone. If your veins are green, you are likely a warm tone; if your veins have a bluish color, you are likely a cool tone.
Jewelry Test: Do you look better in Gold or Silver jewelry? If gold is your color, you are most likely have warm undertones; if you prefer silver, you are most likely to have cool undertones.
White Cloth Test: Put a white cloth next to your bare face and carefully see what color you skin takes on. Your warm tone will show if you seem yellowish, and your cool tone will appear blue or pinkish.
The White vs. Cream TestWhile wearing no makeup, hold up a white and off-white piece of fabric to your face. If your skin compliments the white fabric, you are warm in color; if your skin compliments the off-white fabric, you are cool in tone. If your skin is complimented by both, you are a neutral!
3. Ask for Help!
Yes, you may laugh at this tip, but it’s a great suggestion. If you do not have access to a friend or family member who is skilled in makeup, go to your local makeup store like Sephora or Ulta and have a conversation with the Makeup Specialist. Not many know this, but THIS IS FREE SERVICE!! You don’t have to purchase a minimum to get help to find the foundation that is right for you.
Also, if you are concerned about foundation looking different in the store vs. at home, ask your specialist for a sample of 2-3 foundations that you can try with your own set up. I’ve never met someone who refuses, we are here to help our clients for their own benefits.
One of the first aids I always suggest to clients, is Sephora’s Color IQ technology. Just a simple scan of the face addresses all of the client’s needs and puts it together in a digital look book.
Sephora uses digital technology to prepare a custom catalog for their clients to find their exact match that not only addresses color and undertone, but includes skincare needs and hydration preference.
With the ever evolving technology, you can get your foundation match in less than 20 minutes, and that’s from walking in the store, finding your match, purchasing, and walking out. Leaving you enough time to walk next door and get your fancy latte before you need to pick up the kids.
Now hit the floor running and go find a product that works for you!
Growing up in a Mexican household I got to grow up learning how to cook Mexican dishes by mom, who is an amazing cook. Chicken flautas is hands down the best and easiest dish that became my favorite to cook.
Crunchy, Spicy, & Tasty!
This was one of the first dishes my mom taught me how to make as a child, which I can make from the back of my hand without using a recipe. Sometimes on my days off I make chicken flautas for my family, which they enjoy very much. One thing for sure is that I am glad my mom was able to share this with me because now I can pass this down to my kids one day.
What You Will Need:
Corn Tortillas
Whole Chicken
Pan
2 tablespoons of Oil
Lettuce
Cheese Powder
Sour Cream
Avocado
Red or Green Salsa
First you want to strip a whole cooked chicken until it is boneless and start picking them apart in small pieces. Place the shredded chicken in a bowl.
Next you want to grab about 6-8 corn tortillas and place them in a Ziplock bag and place it in the microwave for about 1 minute. This way the tortilla comes out warm and soft for it to be rolled up with the chicken inside.
Once you finished rolling the tortillas and chicken. You want to grab a pan and place 2 tablespoon of oil inside. Once you start seeing the oil sizzling, go ahead and start placing as many flautas as you can fit in the pan for it can start grilling.
As you roll the flautas around on the pan, it should start hardening into a light brown shade. That lets you know it is ready to go and place them onto a container that will hold all flautas together.
Finally, we have the best for last, the toppings. You want to go ahead add lettuce on top, along with the shredded cheese, and sour cream on top. I personally love spice in my food, so adding salsa on flautas just makes up the whole dish a lot better. Enjoy!
I love all the fresh fruits coming into season! Making homemade jam is so easy and I can’t think of a better way to capture all the fruity flavors. Homemade jams and canned goods also make great gifts, perfect for Mother’s Day, Graduation and Father’s Day.
Here is one of my most favorite and easy jam recipes to share with you!
Ingredients:
6 cups blueberries, washed
4 cups white sugar
2 tablespoons lemon juice
2 tablespoons pure vanilla extract
3 oz pouch of fruit pectin
Details and supplies
15 minute prep time
15 minute cook time
canning 30 minutes
Total time – 60 min
Makes/fills 6 1/2 pint jars
Supplies you will need…
large stock pot
smaller pot (for boiling lids)
masher
measuring cup and measuring spoons
tongs
ladle or funnel
*note: it is very important to sterilize your jars and lids by boiling them in separate pots, keep jars clean and im
Recipe:
In large pot heat and mash berries
Add sugar, lemon and vanilla. Stir constantly and bring to a rolling boil
Add the fruit pectin, stir constantly, bring back to a boil and continue boiling for one more full minute
If needed, skim off any excessive foam. Then carefully ladle or spoon the jam into your clear, prepared jars, leaving 1/4 inch at the top of the jar. Reminder: jars cam be hot, handle with care!
Make sure rims are clean, tap jars to release any air bubbles. Place the lids on the jars.
To can the jam, place the filled, sealed jars into the large pot of water. Make sure they are submerged at least 1 inch below the water and boil for 10 minutes.
Use tongs to carefully remove jars from hot water, place on counter and let them cool completely.
Label and date your jars. Jam should stay fresh and be used within one year. Enjoy and bon appetite!
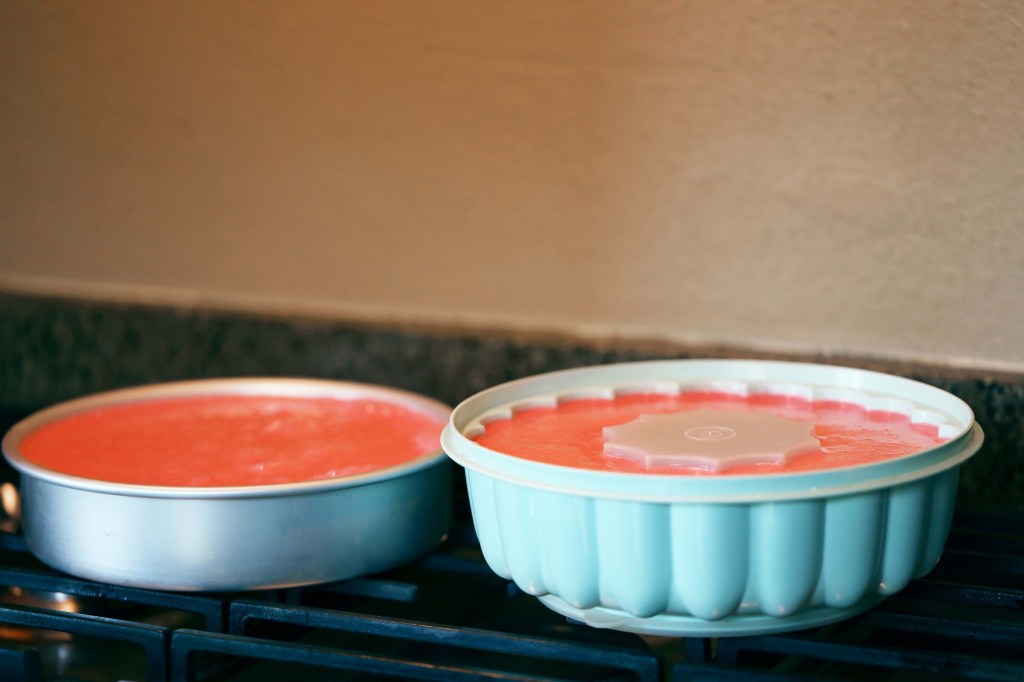
Strawberries and cream are such a treat, but something better than that is having a delicious Jell-O dessert that tastes just as dreamy. It’s super simple too, the perfect spring dessert to prepare for the next party, picnic, gathering, or cookout.
Back when I was a child, one of my great aunts would always make this recipe. I couldn’t wait until dessert time at family gatherings because I knew she would always make it. One day my mom asked for the recipe, and she gave it to her. For Latino families, this is kind of a big deal because we are known for not wanting to share our secret recipes. I’m sure she left out some major ingredient though because it doesn’t quite taste the same. However, through the years, I’ve come to find my mom’s recipe is far better than the original now. We aren’t overly secretive, so we are happy to share this family recipe with all of you.
What You’ll Need
Fresh strawberries 1lb or 16oz
Sour Cream 16 oz
2 Jello-O Strawberry flavor
Sweetened Condensed Milk 375g
2 Large jello molds
Blender
Whisk
Prepare the Jell-O by adding 4 cups of boiling water to the two gelatin mixes. Stir until it dissolves and then add 2 more cups of water and mix. Allow the mix to cool down.
Place the strawberries, condensed milk, and sour cream in a blender, blend until it is smooth.
Once the Jell-O is cooled you will incorporate and mix in the ingredients from the blender into the jello. Using a whisk, mix the ingredients until it is well combined.
Then pour the gelatin into the molds of your choice. It should be enough for two containers.
The end result is a creamy, light and sweet strawberry dessert like no other!
My lovely mother grew up in Brookyln New York, not the best part she actually grew up on the other side of the tracks meaning she wasn’t having super expensive food due to her growing up in the low class. Her favorite meal growing up was spaghetti. It wasn’t all that expensive to make and most of her friends also had it with their families. After moving from Brooklyn to Manhattan to California and now being financially capable of having high class meals, her favorite plate is always spaghetti. She credited John Travolta in Saturday Night Fever for making it cool. This is the recipe for a traditional Brooklyn Style Spaghetti.
Recipe for Brooklyn Style Spaghetti
Prepare a 1 lb box of spaghetti
For the Sauce
1 Tbsp of Olive oil, extra virgin
1 tsp of minced garlic
1 can of crushed tomatoes 28oz
1 can of tomato sauce 8oz
1 can of tomato paste 6oz
6 oz of water
1 ½ tsp of dried basil
1 tsp of salt
For the Meatballs
1 lb of ground beef
½ c of parmesan cheese
2 eggs
½ c of breadcrumbs (Italian style)
1 ½ tsp of basil, dried
¼ tsp of oregano, dried
1 tsp of salt
½ tsp of minced garlic
2 Tbsp of olive oil, extra virgin (for frying meatballs)
My mom and I making Christmas tamales. I’m sorry, I can’t share that recipe.
Looking back on my childhood, I remember my mom always cooking some of the best dinners. Many of the dishes she would make came from my Great Grandmothers cook book. One of my very favorites was Enchiladas Rojas because they’re so delicious!
When I moved away from home, I had to learn how to make these. I remember calling my mom to ask her for the recipe because I was craving them and wanted to make them for my friends. Since then, I can’t even tell you how many times I’ve made them and when I do, I always think of my mom and my childhood. This recipe will definitely keep getting passed down to generations to come.
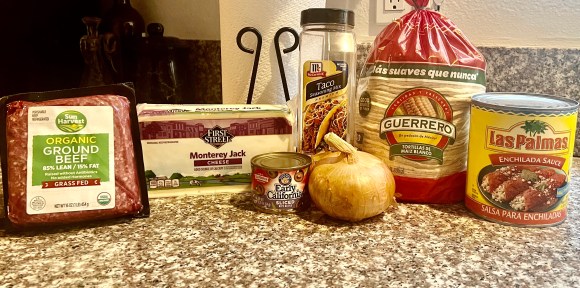
Ingredients
Las Palmas Red Enchilada Sauce
1 1/2 lbs. of ground beef
1 Tbsp. of McCormick Taco Seasoning Mix
18 corn tortillas
1 7.25 oz. can of sliced olives
1/2 cup of diced yellow onion
2 lbs. of shredded Monterey Jack cheese
Vegetable oil
Oven-safe glass dish( I used a 9.5 x 12.5) and it held 12. You can use a bigger one to make more or use more than one dish.
Servings: 8-12 Prepping time: 30 min. Cooking time: 15 min.
Directions
Set your over to 375 degrees.
Fry your ground beef with taco seasoning and onions. Set aside.
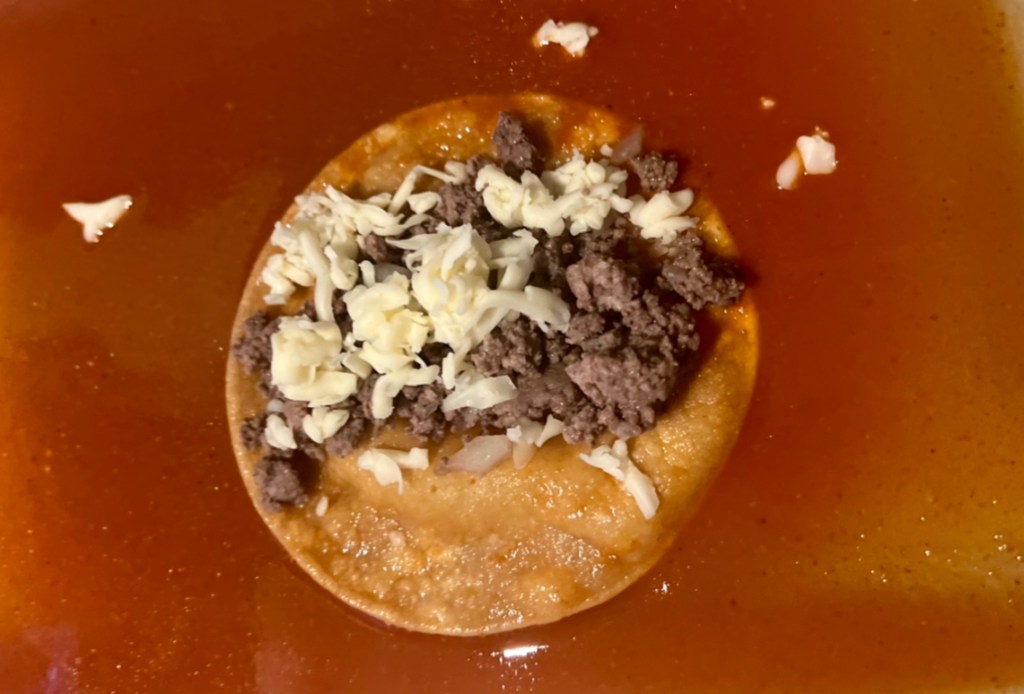
Pour some enchilada sauce in your glass dish to cover the bottom.
4. Lightly fry 1 tortilla on both sides, in a small frying pan with oil
(make sure there’s enough oil in the pan to submerge the tortilla).
5. Once the tortilla is fried, put it in your dish with the sauce. Flip the tortilla over to make sure the sauce is coated all over.
6. Add some meat and cheese to the middle of your tortilla.
7. Fold over both sides of the tortillas and flip it over, so the fold is on the bottom. Place your first enchilada at the top left of your glass dish to create a line. It’s ok if a little meat or cheese out.
Repeat steps4-7, adding more enchilada sauce as needed. When your dish is full, it should like the picture below.
Caution: Don’t submerge your enchiladas in sauce, you only need enough in the pan to coat the tortillas.
8. After your dish is full, add a light layer of enchilada sauce to the top. If you have too much sauce in your pan, you can use a spoon to take some out and pour it on top. Note: You will not use all of the enchilada sauce.
9. Add cheese and olives, if you wish.
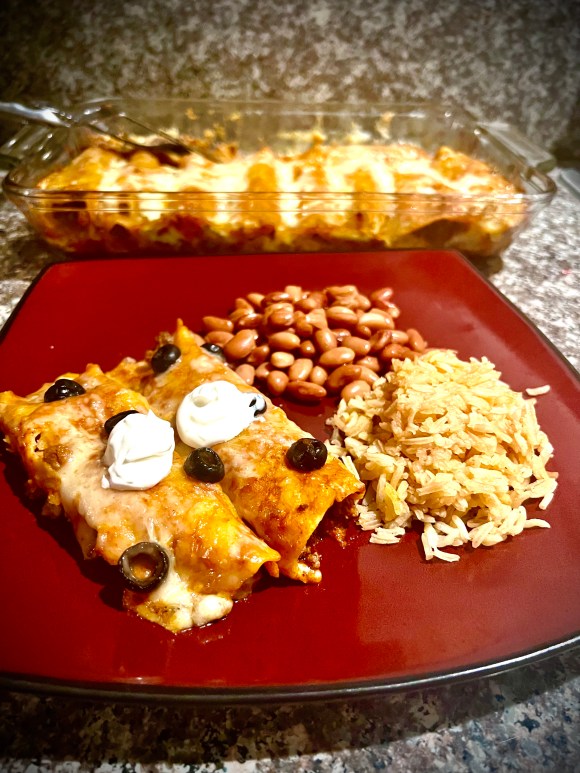
10. Place your dish in the oven for 15 minutes.
Your enchiladas are ready to be served! You can add sour cream, if you’d like. Also, below you can find my recipe for my Mexican Rice. Enjoy!
If you were served 3 dishes that looked the same and you knew your mom made one of them, could you guess which dish was hers? I’m sure I could!Watch below👇🏼
Recipe for Spanish Rice
Ingredients
1 1/2 cups of Jasmin or long grain, white rice
3 oz. of tomato sauce
3 cups of water(room temperature)
1 tsp. of cumin
3 tsp. of Knorr chicken flavor buillon
1/2 cup of diced yellow onion or 1 tsp. of onion powder
2 cloves of minced garlic or 1 tsp. of garlic powder
1/2 cup of vegetable oil
2 quart pot or deep pan
Servings: 12 Prepping time: 15 min. Cooking time: 20 min.
Directions
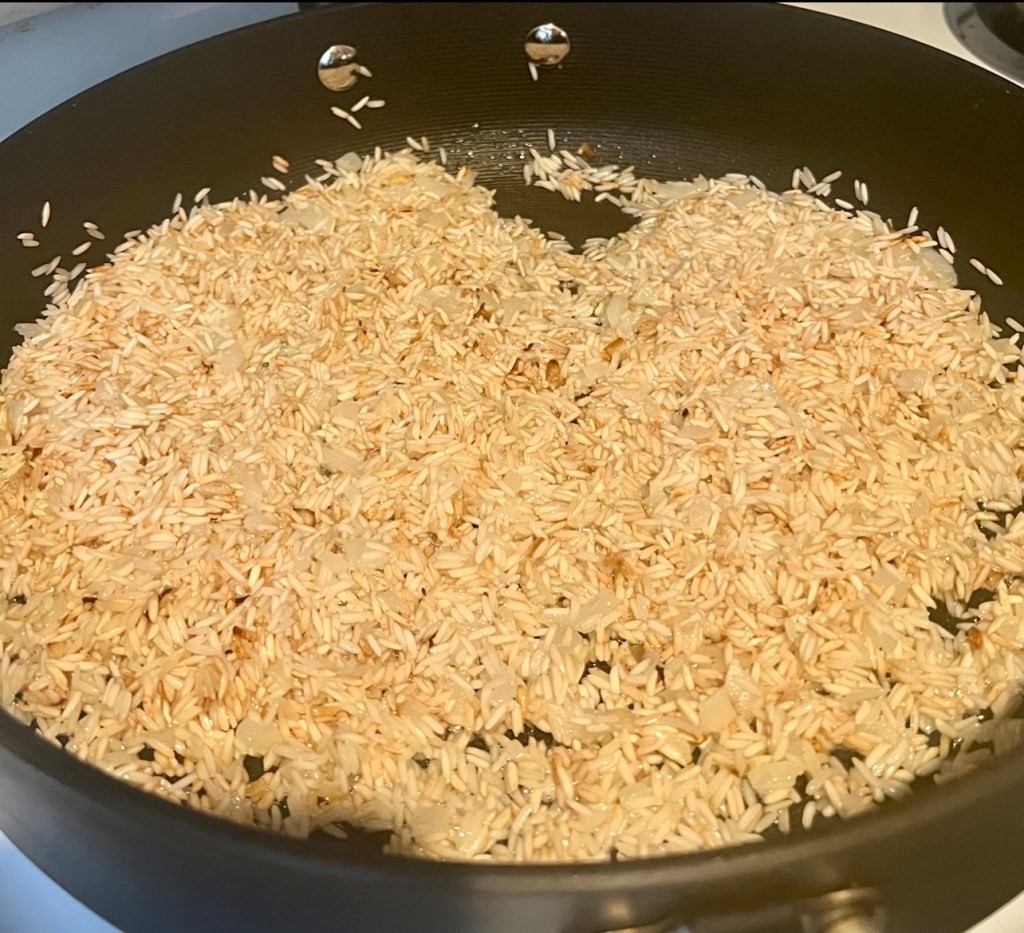
Heat up oil in your pot on medium heat.
Add rice, onion and garlic. Stir frequently Note: If you’re using powder, wait until your rice is brown before you add it.
3. When your rice is light brown, lower the heat and pour in your water slowly. It will steam a little so avoid getting burned.
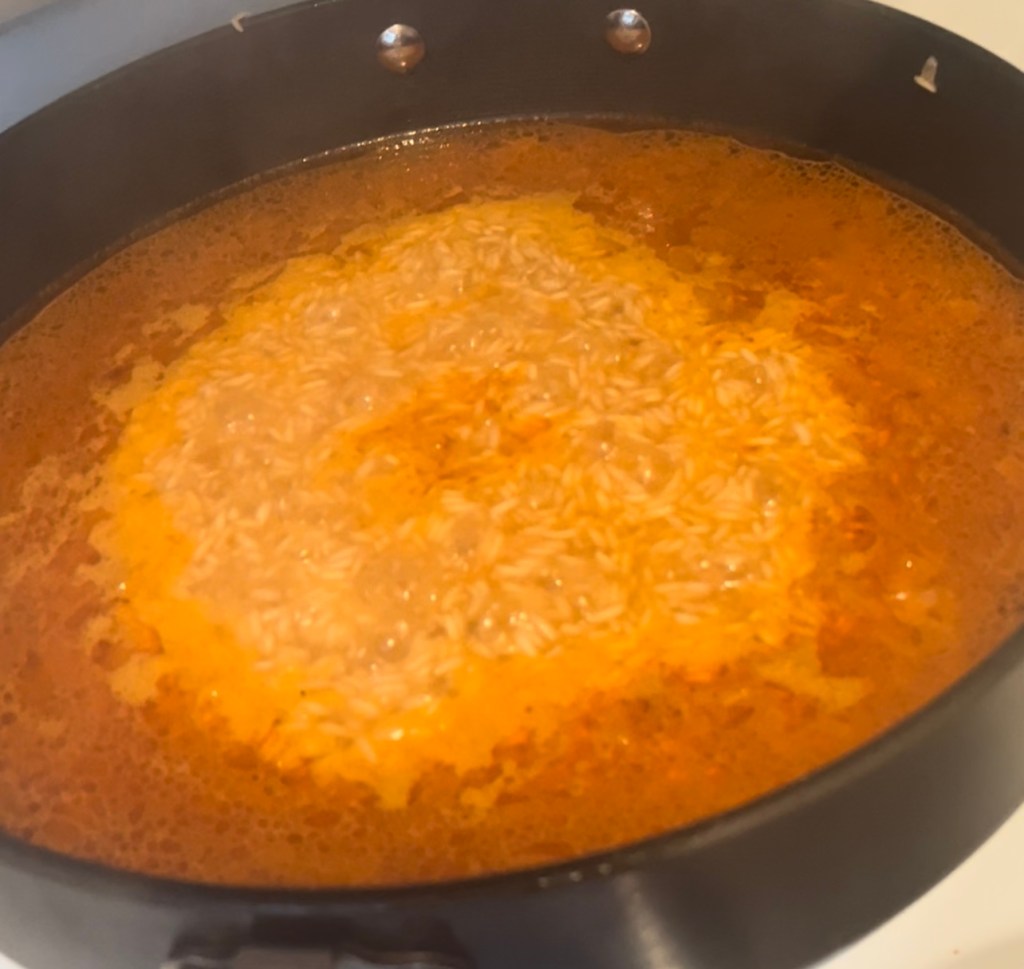
4. Turn your heat back up to medium, to get your water boiling. During this time, add tomato sauce chicken bouillon and cumin. Stir
5. When your water is boiling, turn your heat down low and cover your pot. You will not need to stir your rice anymore.
6. Let your rice cook on low for 20 minutes. You will know it’s done when there isn’t any water in your pan and it looks like the picture below.