Happy Earth Day(week) 2024 Folks! 💚

One Bowl, One Spoon…
(photo by Alev Takil)
What do you think about One Bowl One Spoon Living? Does “one bowl, one spoon” 🥣 resonate with your practical experience and beliefs? Can we all eat from the same spoon, the same bowl, the same watershed, the same planet? Ideally, yes we can and we do. However, practically speaking, our mobility and the time and spatial scales of our perception blind us to the reality of one bowl, one spoon.
Our groundwater contamination today may move so slowly that our grandchildren may suffer after we are long gone. Do you love the idea of sharing as much as you find implementation of one bowl one spoon thinking painfully impractical? If so, I feel your pain. May I empathize with your situation more?
Emerging from COVID, most people insist on their own spoon and their own bowl to make sure we aren’t the next ones to die from contagion or at least don’t get inconvenient viruses. Yet how many millions of plastic spoons, bowls, and even gloves have been added to the Pacific Gyre Plastic patch since 2019? If that plastic shows up in the fish we eat as microplastics, that’s bad and sad. So can we agree we need convenient ways to expend less plastic and also keep it out of our oceans?
How can we correct and atone for our and our family’s pollution-sins of the past? Separation for the sake of survival and convenience was important to help us get through the short term emergency of the COVID Pandemic. We survived.
2024 presents longer term threats; slower moving train wrecks. Our emissions of Carbon Dioxide (CO2), Methane (CH4), r410a refrigerant, sulfuryl fluoride, and other Greenhouse Gases have intensified our weather and our climate. Storms arrive with more intense rain, more powerful winds, droughts last longer with lower humidity and higher maximum temperatures … and in some cases lower minimum temperatures. Bursting water pipes in surprise Texas freezes caused by an unstable jet stream remind us how Climate Change is a more helpful term than Global Warming. Does your (and our) behavior contribute to the Climate Emergency? Can your (and our) choices make a positive or negative difference that is significant? Our tragic, common “too small to matter but too common to not matter” reality of burning and releasing GHG’s merits attention: what we do DOES matter to our climate here, now, and in the near and distant future. Our example to others matters in our community and there are more personal, immediate effects.
As one of 8,000,000,000 people on Earth, can anyone seriously say that a monthly burning of $70 of gasoline, $70 of natural gas for water heating, cooking and clothes drying makes any significant difference to solve our current Climate Crisis? While I admit it is difficult to grasp, the answer is “Yes.” I believe it does make a difference. COVID helped show how. Combustion byproducts from natural gas cooking and clothes-drying have a real effect on millions of asthma victims. People exposed to higher levels of combustion byproducts, including particulate pollution, for longer durations died and experienced complications from COVID at significantly higher rates. Hypocrisy results when we are forced to choose between inconvenient results and convenient bad behavior. Most people choose what is convenient…particularly those who earn less or those who possess less wealth…but also those who have so much income and/or wealth that they are unaccustomed to being held to account for their impacts on others.
We are constantly rewarded when we respond quickly and early to opportunities as they arise, with seemingly no time to pause to observe and consider the effect of our exhaust. The struggle is real. With pressure to do more, stay up later, yet still arrive to appointments on-time it is so common to feel that pressure to drive what ever car we can afford. With electric cars generally costing over $20,000 used and over $40,000 new the shift from gasoline to battery-powered is challenging, with or without range anxiety. The financial barriers to converting are significant and compelling. More financially accessible options include:
$7 to eat a meal (or cake+ice cream?) with less meat, fewer food-miles, and/or prepared with 100% Renewable Clean Power Alliance electricity…you know, compassionate eats.
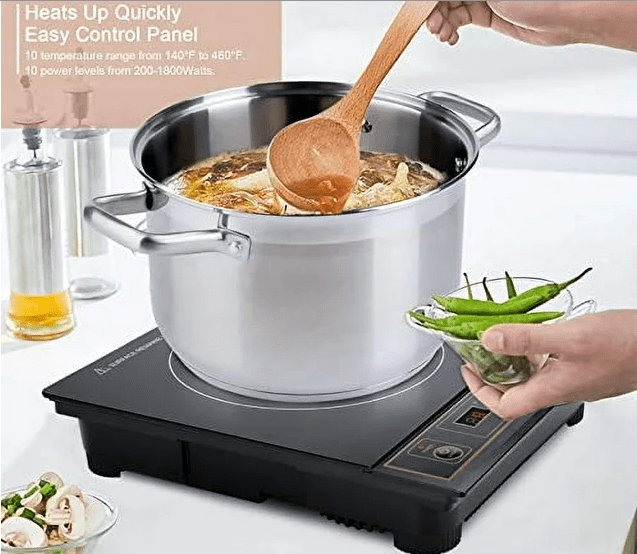
$70 +/- induction plate to cook with Clean Power Alliance 100% renewable electricity,
$700 e-bike to commute carefully with commutes twice as long as car commutes,
$70 monthly bus pass with commutes that involve meeting new friends on the bus,
$700 electric clothes dryer,
$700 upgrade for your home/apartment’s electric panel to power electric dryer &/or car charger,
$70-700 of air-sealing and insulation improvements,
$700+ portable dual function heat pump air conditioner plus heater with air filters,
$70 Lyft or Uber rides where you specifically request or select electric only options.
$170 or less on a good pair of running shoes (good for you and your planet!).
FREE and FUN: collaborate with your neighboring renters to lobby your land-lord’s conversion to 100% Renewable Clean Power Alliance Electricity.
May I challenge you to cut your CO2e in half every year? Meet your needs, while considering Our Earth Community’s needs. If you do, you might just learn valuable expertise and meet interesting friends to help you build a more compassionate and abundant reality for you and those you affect. When it gets challenging, please know I feel it too and reach out to friends to talk about your struggle and successes.
May you Balance2thrive®
G Naugles, MSBio, MBA, GISP, M.Ed., CalBRE, RCE, BSCE, CPHT
Cool Personal Action Links:
https://www.cleanpoweralliance.org or call 888-585-3788
https://www.wdcappliances.com/catalog/induction-ranges
https://www.reidsappliances.com/_CGI/SEARCH3?PN=induction+range
Cool Big Picture links: