Dylan Reed is a second year student at Ventura Community College studying Social Media Marketing. A long time Ventura local and foodie, Dylan loves exploring new restaurants and coffee shops around the county. Dylan is also a huge technology enthusiast, who has recently dove into the world of 3D-printing.
Ever since I got my 3D printer, I thought about starting an at-home 3D printing business. I have all the tools I need at my disposal, and just needed to take that first step to start. In this video, I document the beginning of my journey to starting my own small business out of my room, from getting my printer all set up, handling my first customers, and starting to market and advertise my services. Join me as I learn the ins and outs of being a maker, and trying to earn some cash at the same time!
Follow my Instagram accounts to keep up as I continue this project!
Ever since I began diving into the complex hobby of 3D-printing at the beginning of 2025, I had the idea of starting a small scale print farm as a side hustle. It seemed easy enough; I already had all I needed to start: a printer, filament, and access to the best marketing tool in history – social media. Despite apparent ease of entry, I was seemingly met with hurdles each step of the way, and although these issues are shared by just about everyone in the hobby space, I hope to share my own experiences dealing with them.
1. Setup
The first, and in my case, easiest, challenge that needed tackling is actually setting up the printer. The out-of-box experience can differ wildly depending on the brand, but one of the reasons I ended up buying the Elegoo Neptune 3 Plus was its ease of setup. The printer came almost complete when it arrived, with the base plate (housing its power supply, printing bed, and microcontroller) and gantry (the part responsible for vertical, or Z axis, movement with the hot-end attached) needing to be screwed together with braces attached to keep everything rigid. In all, assembly took about 30 minutes when following the included instruction booklet. Easy. The real challenge began once it was powered on for the first time: leveling. Almost all modern 3D printers have some system of auto-leveling baked in, where the hot-end, the bit that actually heats and extrudes the filament, moves up and down over a set number of points along the printing bed to measure something called the Z-offset. This offset tells the printer how much vertical movement to add or subtract from its determined path depending on where it is on the bed, and this is usually enough to ensure quality print layers. However, this can only compensate for so much, and to ensure it isn’t overcompensating, manual leveling of the bed must be done. This was the biggest challenge for me as a newbie to the hobby, as it required multiple cycles of heating and cooling the bed, all while adjusting the level with screws under the bed to ensure it was as level as possible. This step was easily the longest, taking several hours over a few days to ensure things were right before I could even do a test print, but once things looked good I was off to the races.
2. Slicers
Or at least I thought I was. The next hurdle I needed to pass was choosing a slicer to use. A slicer is a program for your computer that takes a 3D model and “slices” it into hundreds or thousands of layers and converts those to instructions for the printer to read. This is how the printer knows what paths to take, how much filament to extrude and at what temperature to make the model you want. Each slicer, no matter who it’s made by, works in the same way, but there are some that are better than others. The one that was recommended for my printer was programmed by Elegoo, called Cura Slicer, and was made to be as user friendly as possible, which sounded great for me. But, as I browsed through forums for my printer I kept coming across people saying the print quality with Cura isn’t as good as another called Orca. As I didn’t want to be wasting time and filament on prints I wouldn’t be happy with, I ended up going with Orca at first. But my word, is Orca a nightmare for beginners. From selecting which printer you have to the endless, meaningless adjustments you can make to the print, this program gave no information to help you if you didn’t already know what you were doing. It was so overwhelming and poorly designed that I ended up having to take its quality at other’s words, and scurried back to Cura where I at least was walked through its initial setup. The one thing I took away from that debacle was it’s okay to get your toes wet in the kiddie pool before taking a high-dive into the deep end. And when I did finally get a test print made, I was more than happy with its quality, and it showed my leveling gauntlet from earlier had paid off.
Prints for my businesses first customer, hanger clips for ceiling fan remotes, sliced on Cura
3. Mishaps and Maintenance
There’s no doubt that 3D printers are complicated machines. Their precision comes at the cost of tight tolerances and smooth turning motors to make each layer as even as possible, and constant check-ups are required to make sure you don’t end up with a smeared mess of plastic dangling off the nozzle. I learned that there were numerous steps to take before setting off on a print to make sure things went smoothly, from ensuring bolts that held that hot-end onto the gantry were tight to lubricating the stepper motors on the Z-axis to help keep layers consistent. The two biggest steps I failed to take at first, though, were making sure the nozzle was clear of clogs and keeping the PEI bed-sheet clean.
The hot-end nozzles are small, threaded brass with a 0.4 mm opening for the filament to flow out of, and one of the most common issues to have with them is a small metal flake left over from manufacturing coming lose and clogging the opening. When this happened to me, I only noticed when molten filament began flowing out of the cooling fan before solidifying, creating an enormous blob that clogged up the entire hot-end. Thankfully, a teardown and an hour of scraping bits away saved me from a costly replacement. The other issue that left me with ruined prints (on numerous occasions) was failing to clean the PEI bed-sheet clean. PEI, or polyetherimide, bed-sheets are useful 3D printer accessories as their texture is grippy when hot, and then smooth once they cool allowing for easy removal of a printed piece. However, they’re useful only as long as they’re maintained, as they’re really vulnerable to dust and fingerprints that compromise their adhesive qualities. I failed to properly clean mine with soapy warm water on several prints, resulting in the print breaking loose from the bed and smearing hot plastic all over, wasting meters of material. I thought I had learned my lesson the first time…
My Lessons Learned
If there is any single takeaway from all the issues I’ve had getting into 3D printing, it’s this: go slow. There isn’t any rush, as with any hobby, and there’s no expectation to get things perfect right away. I feel as though I was disillusioned by online guides and self-proclaimed gurus into thinking things would be smooth as butter once I got the printer up and running, and getting dragged through the mud of issues and setbacks only solidified what I ended up learning. 3D printing isn’t an easy hobby to jump into, and it takes patience and some technical know-how to navigate the deluge of information and come out sane. I do really hope that in time it becomes more simplified; closer to a true plug-and-play experience. There are some products out there that have been tailored to new hobbyists, such as the printers from Bambu Labs, but the cost of those is still a prohibitive barrier for some.
In closing, I hope my experiences can be taken not as a cautionary tale for those wanting to get into 3D printing, but as valuable information on what to expect that is seldom mentioned openly online. 3D printing is a wonderful, satisfying hobby for those inclined to tinker and create, and one that no-one will ever truly master. There will always be a new technique, new thing to print, new modification to mess with, and plenty of screwups to learn from. And that’s why I love it.
Have you ever wanted to dive into the rabbit hole of tequila? Join Dylan and agave master Ruben Salinas as we talk all things tequila, from its history to its production, along with how to do a proper tasting!
As we begin slipping into spring, and later summer, sooner than later that first real heatwave will hit and the only thing to counter the muggy swelter will be something cold, lubricating, and easily accessible. Thankfully, Ventura County has seen an explosion in local bars and restaurants that have stepped up their mixology game and are slinging some serious cocktails that are sure to beat that mid-afternoon heat.
These places are pushing the envelope of mixed drinks and going further than a standard Old Fashioned or Cosmo by including locally sourced produce and spirits, to not just make a delicious drink, but one that shows what our beautiful county has to offer. I’ve taken the liberty to sacrifice some liver functionality in the search for the best places to visit on a weekend afternoon (or weekday, I won’t judge) that you can add to your Ventura vacation itinerary.
Bank of Italy – Cocktail Trust
Bank of Italy Cocktail Trust has been a Main Street institution for quality craft cocktails ever since it opened. Situated inside the historic 1920’s Beaux-arts style building on the corner of Main and Oak, the warm, hip atmosphere and intimate seating juxtaposes the stern Art Deco-esque facade, and the attentive bartenders are happy to whip up any of their extensive offerings. With many of the drinks taking inspiration from Italian classics, the BOI puts a modern twist on their drinks with unique ingredients and some local liquors. The drinks we settled on were the Gin Fix and Montenegro Daiquiri, both featuring Ventura Spirits liquors. The Gin Fix balanced VS’s Wilder Gin’s herbaceous vigor with pineapple and vanilla and gave off matured Piña Colada vibes. The Montenegro Daiquiri’s pairing of rum, pineapple, citrus and Ventura Spirit’s Angeleno Amaro’s orangey spice made for a very simple yet complex take on the 19th-century Cuban classic.
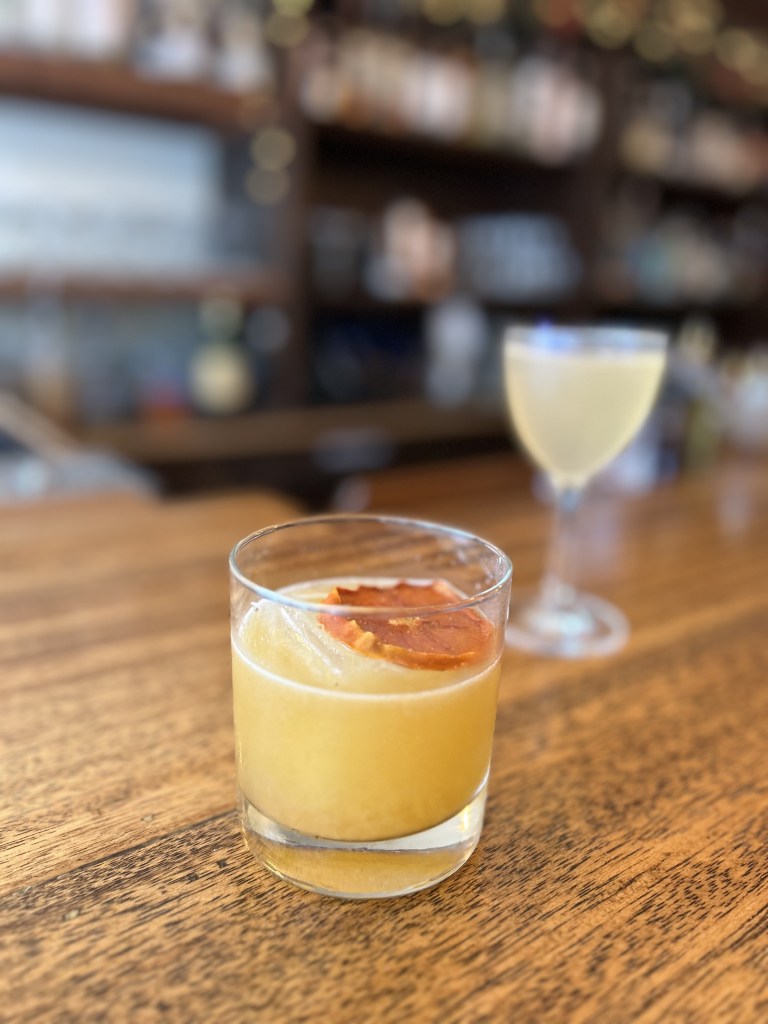
The Dutchess
The Dutchess has quickly become on of the flagship restaurants and bars in the Ojai valley, and has been popular with locals and tourists alike since its opening. With an inspired, modern take on drinks and Burmese cuisine, The Dutchess is a vibrant and cozy establishment that takes pride in working with local farms, breweries, and distilleries. Their cocktail menu rotates with the season, so other than a few staples don’t expect to order the same thing twice. After conversing with one of their bartenders and friend of mine, Eric, we volunteered as guinea pigs to try some drinks he had been working on. The first, a take on an Amaretto Sour sans egg white, used their house-made Amaretto with local botanicals and a persimmon simple syrup to balance the bite of the bourbon. The second drink, his spin on a Paper Plane, subbed the standard lemon juice for Pixie tangerine juice to give the modern classic its own Ojai twist. Both drinks were fresh, vibrant and packed a serious bourbon punch, qualities shared with all The Dutchess has to offer, cementing it as my #1 recommendation for a cozy drink in Ojai.
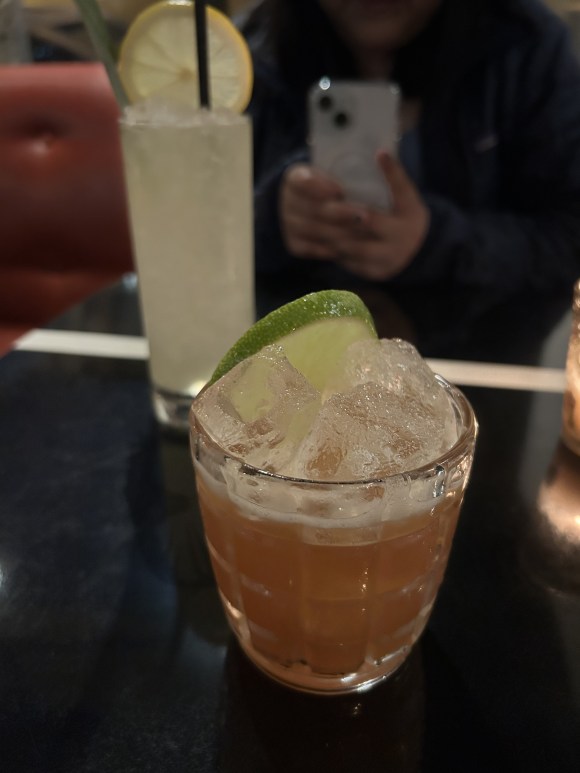
Jaguar Moon
One of the newest additions to Ventura’s collection of cocktail lounges, Jaguar Moon opened November of 2024 and brought a slew of Yucatánian flavors to the county. The bright, open space with vibrant colors and welcoming staff boasts a large collection of innovative drinks highlighting the many flavors and ingredients of the Yucatán, and their kitchen, Cocina Jaguar, offers Mexican dishes you can’t find anywhere else in Ventura.
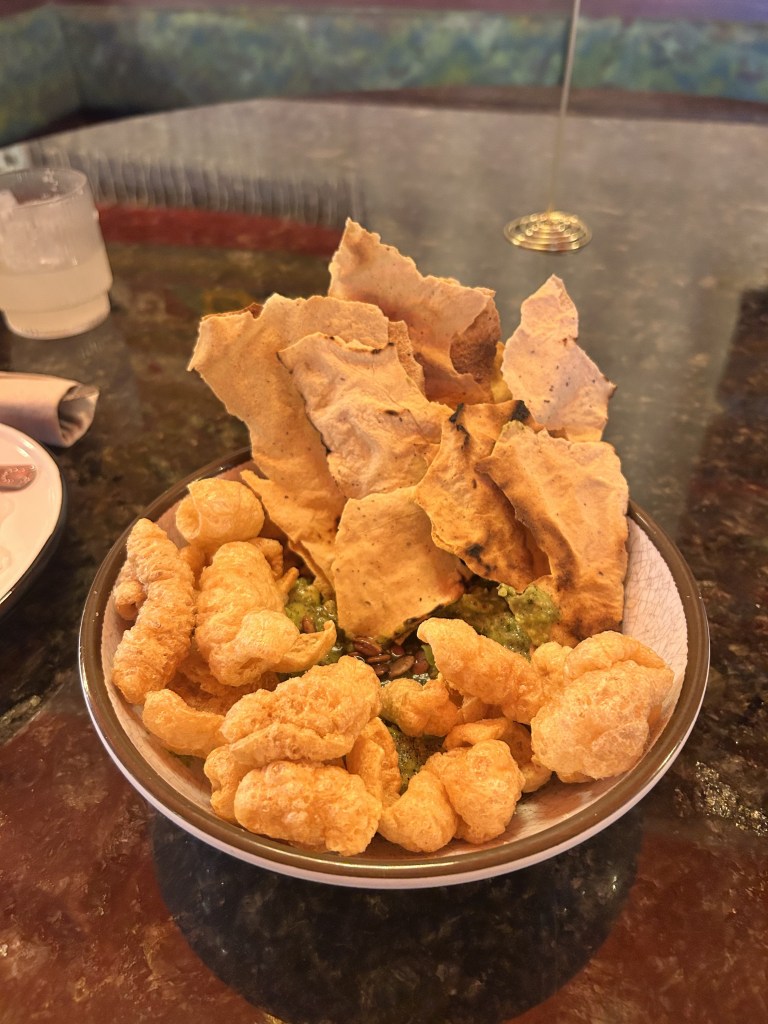
For our visit, we started off with their smoky mezcal margarita and the tropical Oaxacan Cobbler, the latter truly being an adult fruit smoothie with a punch. To maintain sobriety we opted for some small plates, and decided on the Peruvian scallop crudo, their traditional guacamole with chicharrónes and salsa macha, and one of their cochinita pibil tacos. The food was incredible, with bold flavors and fresh, locally sourced ingredients. If you plan on a visit, I highly recommend the guacamole to share, and the cochinita tacos for yourself.
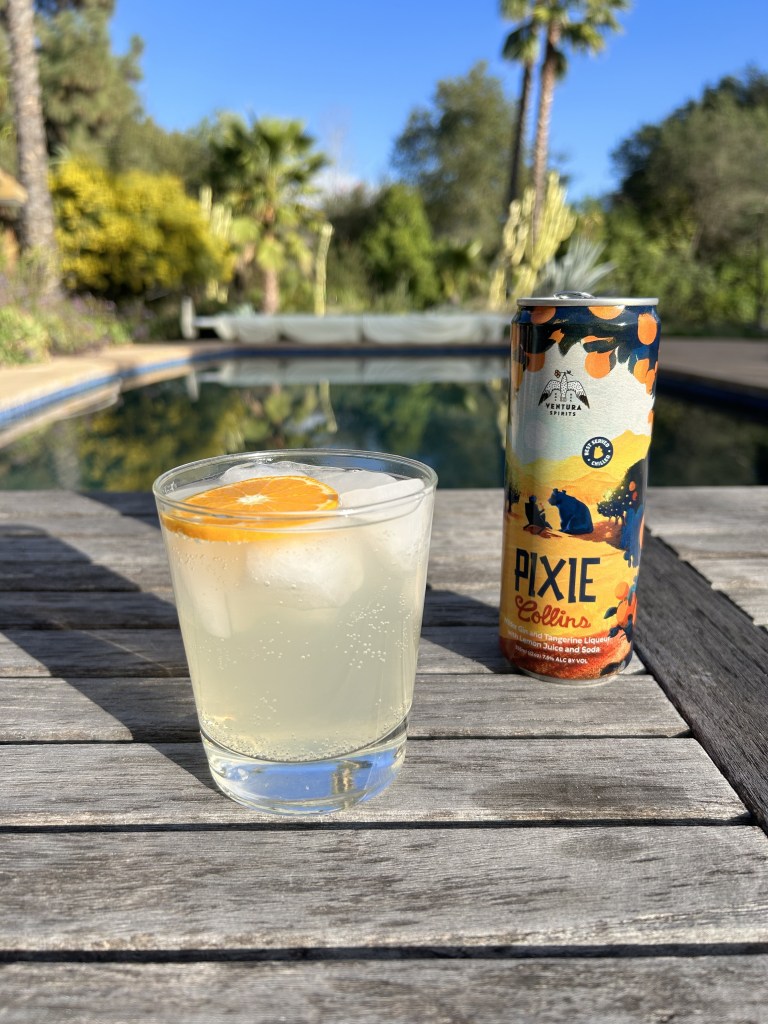
Bonus – Ventura Spirits Pixie Collins
Although not a cocktail bar, Ventura Spirits is our local distillery whose liquors and canned options are perfect for your home bar or fridge. And nothing screams local more than their take on classic Tom Collins. Using their Wilder Gin (that is made with local botanicals including purple sage, sagebrush and pixie peels) and Ojai Pixie-cello, the Pixie Collins is perfect for a weekday afternoon when there’s not enough time for a bar, but enough daylight to sit outside and wind down.